CarouselView with page indicators

The Article was updated to add Material Design compability. The page indicators are no longer dots now, they are squares. If you don't want squares and material design, check out the GitHub Project for the old version.
Xamarin.Forms is a great package of ready to use elements for maximum code sharing accross iOS,Android and Windows(Phone). It is steadily expanding and recently the CarouselView element joined the family. CarouselView is a great new addition because it allows you to add a carousel to nearly anything that can hold a view, so you are no longer limited to whole pages as with CarouselPage. Plus, CarouselView is intented to replace CarouselPages once it's completly stable. It was introduced a bit early in its development stage and disappeared fromt the stabe release a bit later. To be able to use it you need to pull the pre-release NuGet of it, but more on that late.
What do we do ?
First, let's take a look on what we will create (old version on the left, new one on the right)
As you can see, we got a Carousel here with working indicators, which you can click to switch to a given page! Now what is so cool about this is, you can put it anywhere you like, it does not need to be fullpage!
The implementation
So let's get started. Create a new Xamarin.Forms Project and add the Xamarin.Forms.CarouselView NuGet package to your shared project and your platform-specifique ones like shown below :
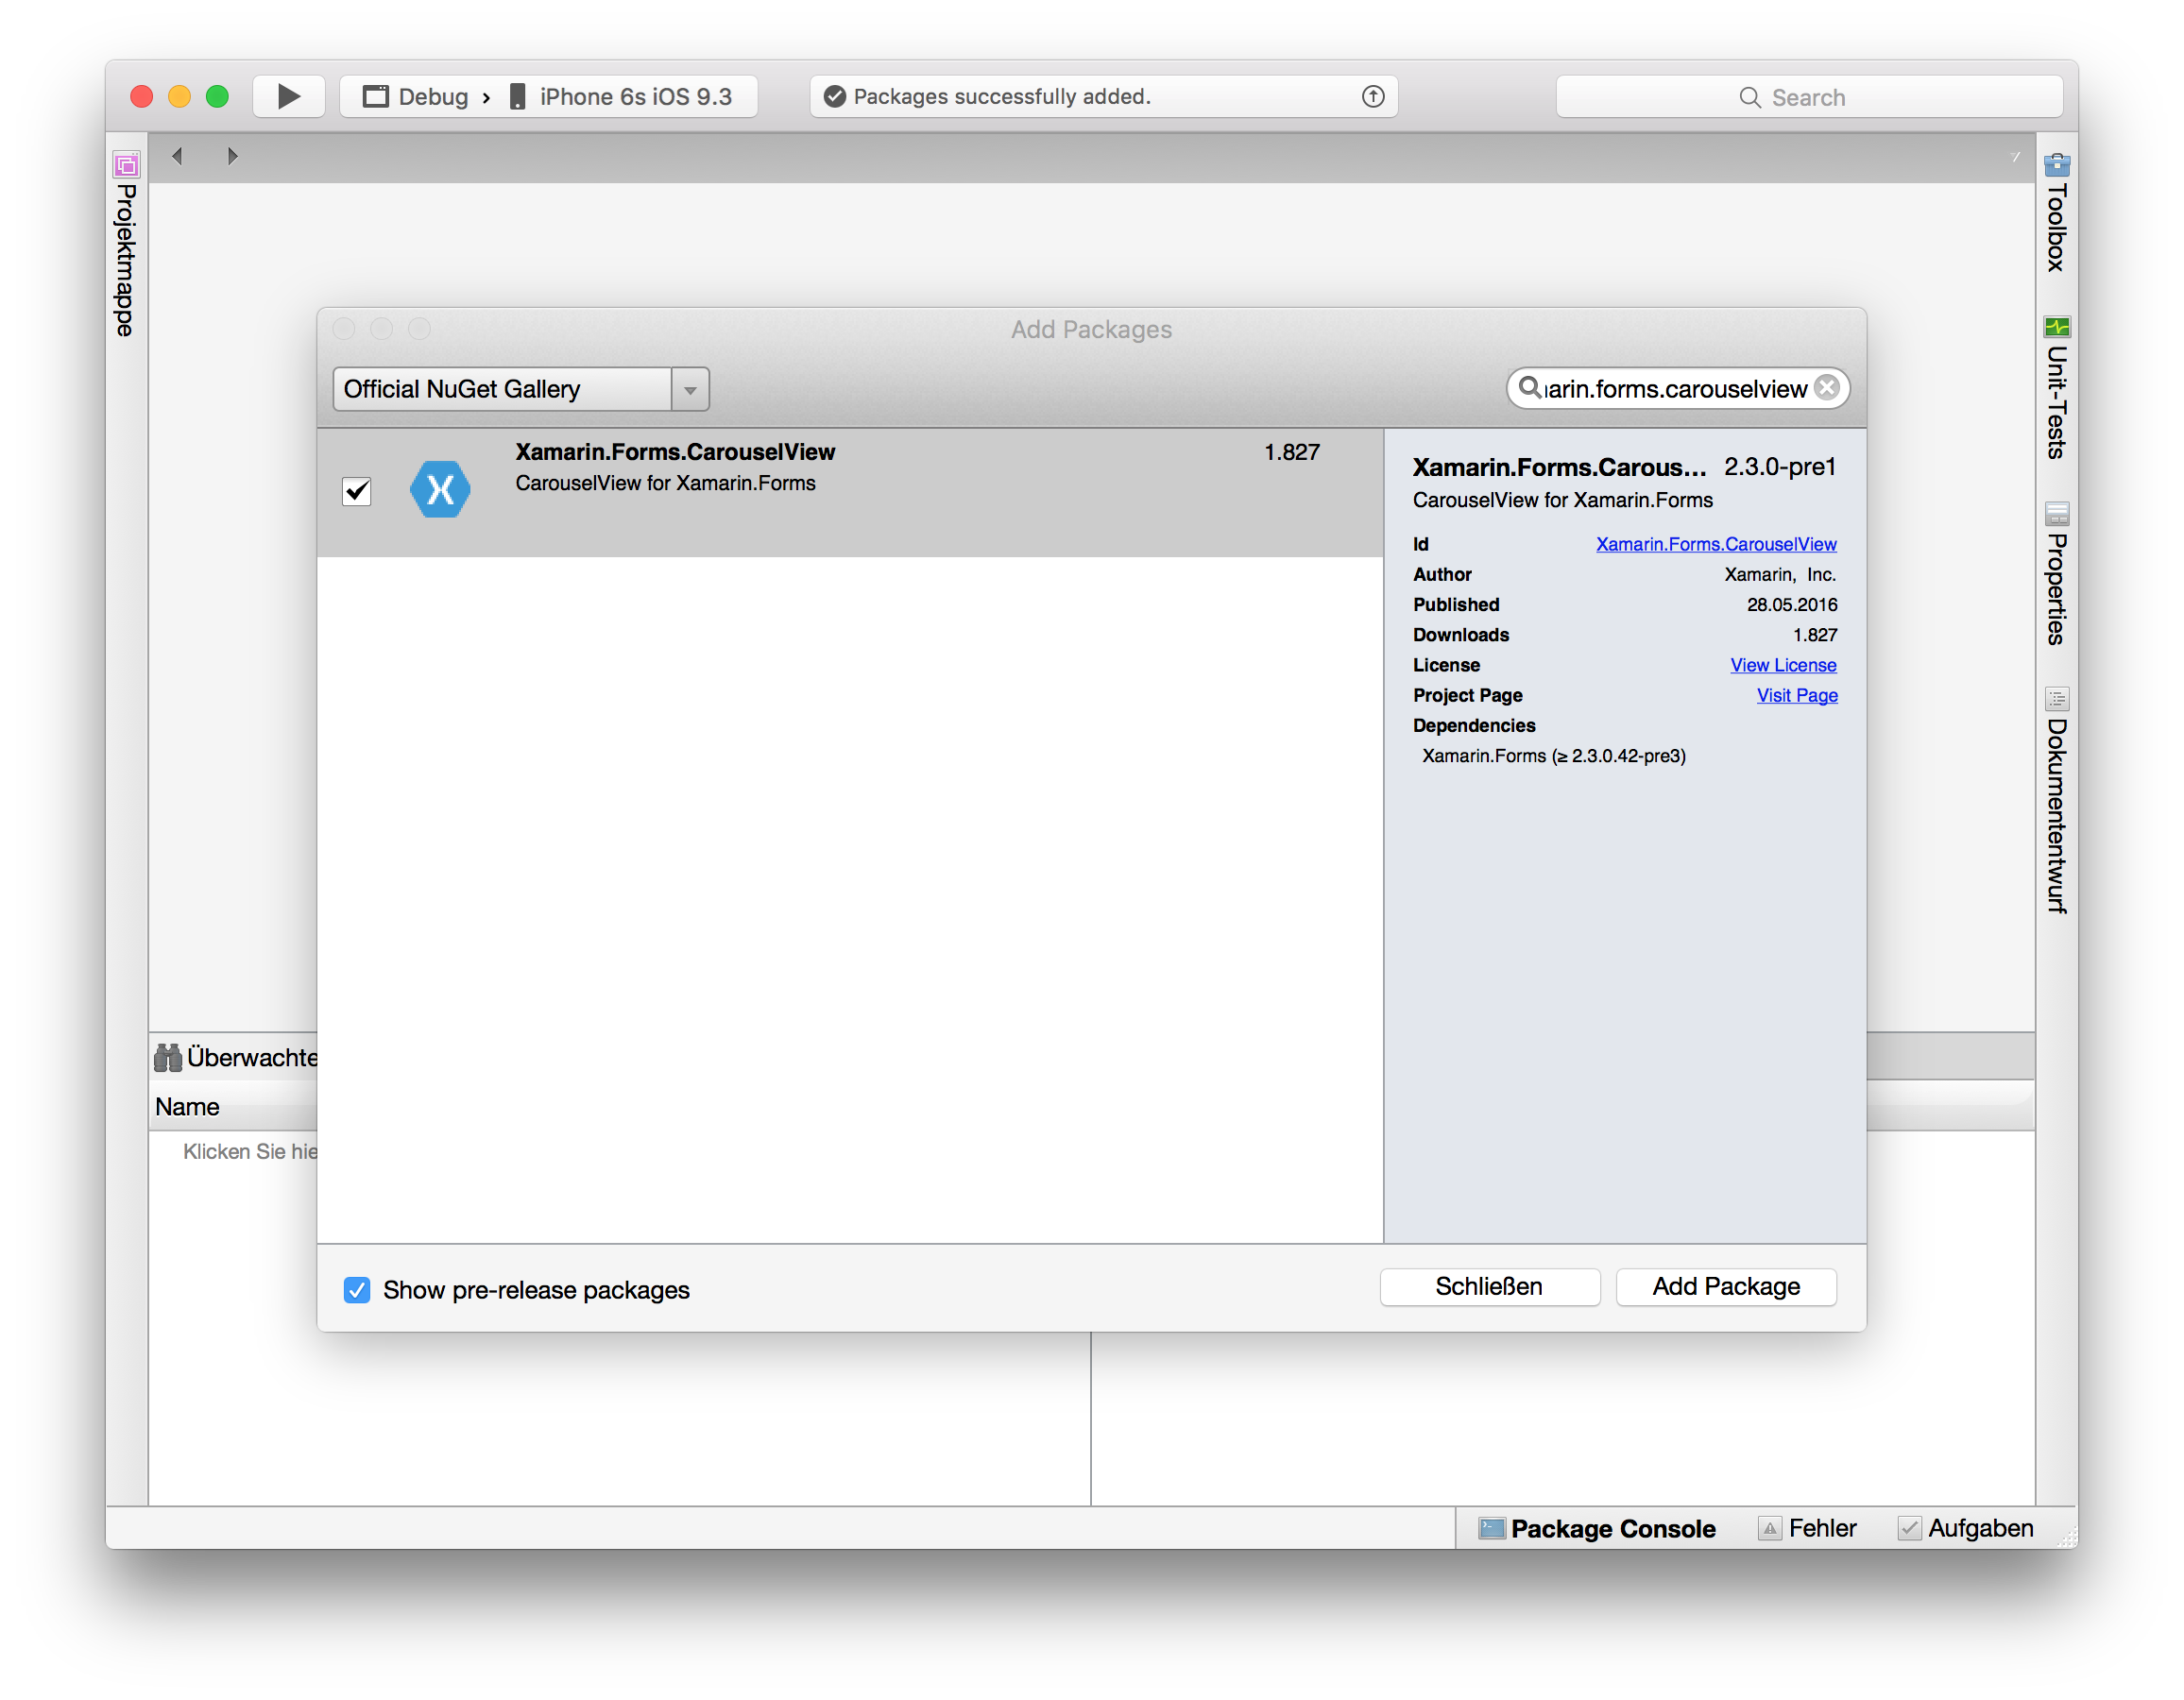
At the time of writing, the CarouselView package was still a pre-release package. So make sure to check the corresponding box or else you wont find the NuGet. Next, because this is a prerelease package, you need to make sure the linker catches the packages when building for release, so add the following lines after your Forms.Init(); call in each project's initializer file (AppDelegate.cs for iOS, MainActivity.cs for Android etc.) Note that once the package is out of its beta-stage, you can omit these lines :
var cv = typeof (Xamarin.Forms.CarouselView);
var assembly = Assembly.Load(cv.FullName);
Ok so now that we are all set up and ready to go, let's set up this CarouselView! The following files and code will all be placed in your shared project, there is no need to code anything platform specifique!
Carousel.cs
using System;
using System.Collections.Generic;
using System.Collections.ObjectModel;
using System.Linq;
using System.Text;
using System.Threading.Tasks;
using Xamarin.Forms;

namespace Near.DotCarousel
{
    public class Carousel: AbsoluteLayout
    {
        private DotButtonsLayout dotLayout;
        private CarouselView carousel;

        public Carousel(ObservableCollection<CarouselContent> pages)
        {
            //Set the Layout to fill and expand to occupy its whole space.
            HorizontalOptions = LayoutOptions.FillAndExpand;
            VerticalOptions = LayoutOptions.FillAndExpand;
            //Create the CarouselView itself.
            carousel = new CarouselView();
            //And make it expand to the whole Layout.
            carousel.HorizontalOptions = LayoutOptions.FillAndExpand;
            carousel.VerticalOptions = LayoutOptions.FillAndExpand;
            //PLACEHOLDER 1 : THE DATATEMPLATE
            //PLACEHOLDER 2 : THE CAROUSELVIEW PROPERTIES
        }
        //PLACEHOLDER 3 : PAGE EVENTS
    }
}
The Carousel-Class can lateron be created and added anywhere where an AbsoluteLayout fits in. As you can see, we created a constructor hat accpets an ObservableCollection
//Create that new DataTemplate
var template = new DataTemplate (() => {
    //We chose an AbsoluteLayout for this because it is the
    //most flexble layout in my opinion.
    var page1 = new AbsoluteLayout();
    page1.BackgroundColor = Color.FromHex("2C2E31");
    page1.HorizontalOptions = LayoutOptions.FillAndExpand;
    page1.VerticalOptions = LayoutOptions.FillAndExpand;
    // We make the background color bindable so the ItemSource
    //Can set the color.
    page1.SetBinding(AbsoluteLayout.BackgroundColorProperty, "BackgroundColor");
    //Lets create the header label
    var lab = new Label()
    {
        FontSize = Device.GetNamedSize(NamedSize.Large, typeof(Label))+10,
        FontAttributes = FontAttributes.Bold
    };
    lab.TextColor = Color.White;
    lab.HorizontalOptions = LayoutOptions.Center;
    lab.VerticalOptions = LayoutOptions.Center;
    // Bind it's content to the Header-attribute
    lab.SetBinding(Label.TextProperty, "Header");
    // Create the second label
    var lab2 = new Label()
    {
        FontSize = Device.GetNamedSize(NamedSize.Large, typeof(Label))
    };
    lab2.TextColor = Color.White;
    lab2.HorizontalOptions = LayoutOptions.Center;
    lab2.VerticalOptions = LayoutOptions.Center;
    //Bind its conteent to the Content1-attribute
    lab2.SetBinding(Label.TextProperty, "Content1");
    var lab3 = new Label()
    {
        FontSize = Device.GetNamedSize(NamedSize.Large, typeof(Label))
    };
    lab3.TextColor = Color.White;
    lab3.HorizontalOptions = LayoutOptions.Center;
    lab3.VerticalOptions = LayoutOptions.Center;
    //And finally bind the last label.
    lab3.SetBinding(Label.TextProperty, "Content2");
    // Add everything to our Layout.
    page1.Children.Add(lab);
    page1.Children.Add(lab2);
    page1.Children.Add(lab3);
    // And position the content
    AbsoluteLayout.SetLayoutBounds(lab, new Rectangle(0, 0.3, 1, 0.2));
    AbsoluteLayout.SetLayoutFlags(lab, AbsoluteLayoutFlags.All);
    AbsoluteLayout.SetLayoutBounds(lab2, new Rectangle(0, 0.4, 1, 0.2));
    AbsoluteLayout.SetLayoutFlags(lab2, AbsoluteLayoutFlags.All);
    AbsoluteLayout.SetLayoutBounds(lab3, new Rectangle(0, 0.5, 1, 0.2));
    AbsoluteLayout.SetLayoutFlags(lab3, AbsoluteLayoutFlags.All);
    return page1;
});
Ok so we now got our template setup. Next is our content template which we will be using to feed data to the view.
CarouselContent.cs
This template-class will hold all the properties we binded in our Carousel's DataTemplate :
using System;
using System.Collections.Generic;
using System.Text;
using Xamarin.Forms;

namespace Near.Classes
{
    public class CarouselContent
    {
        public int position { get; set; }
        public string Header { get; set; }
        public string Content1 { get; set; }
        public string Content2 { get; set; }
        public Color BackgroundColor { get; set; }
    }
}
This is reallyonly a container to hold our data.
Next, lets create our page indicators ! We will be using buttons as indicators, which will allow you to press on the indicators to switch to the desried page.
DotButtons.cs
using System;
using System.Collections.Generic;
using System.Linq;
using System.Text;
using System.Threading.Tasks;
using Xamarin.Forms;

namespace Near.DotCarousel
{
    public class DotButton : BoxView
    {
        public int index;
        public DotButtonsLayout layout;
        public event ClickHandler Clicked;
        public delegate void ClickHandler(DotButton sender);
        public DotButton()
        {
            var clickCheck = new TapGestureRecognizer()
                {
                    Command = new Command(() =>
                        {
                            if (Clicked != null)
                            {
                                Clicked(this);
                            }
                        })
                };
            GestureRecognizers.Add(clickCheck);
        }
    }
}
As you can see this is a very simple class, extending the Button-Class with an index and a reference to the layout, which we will create just now!
DotButtonsLayout.cs
In this file we will create the page indicators. To maximize customizability, we write a constructor that takes the number of pages, the size of the indicators and their color as arguments:
using System;
using System.Collections.Generic;
using System.Linq;
using System.Text;
using System.Threading.Tasks;
using Xamarin.Forms;

namespace Near.DotCarousel
{
    public class DotButtonsLayout : StackLayout
    {
        //This array will hold the buttons
        public DotButton[] dots;
        public DotButtonsLayout(int dotCount,Color dotColor,int dotSize)
        {
            //Create as many buttons as desired.
            dots = new DotButton[dotCount];
            //This class inherits from a StackLayout, so we can stack
            //the buttons together from left to right.
            Orientation = StackOrientation.Horizontal;
            VerticalOptions = LayoutOptions.Center;
            HorizontalOptions = LayoutOptions.Center;
            //Here we create the buttons.
            for (int i = 0; i< dotCount; i++)
            {
                dots[i] = new DotButton
                {
                    HeightRequest = dotSize,
                    WidthRequest = dotSize,
                    BackgroundColor = dotColor,
                    //All buttons except the first one will get an opacity
                    //of 0.5 to visualize the first one is selected.
                    Opacity = 0.5
                };
                dots[i].index = i;
                dots[i].layout = this;
                Children.Add(dots[i]);
            }
            dots[0].Opacity = 1;
        }
    }
}
Ok so now we nearly finished our Carousel! We got two more placeholders to fill in our Carousel file!
Carousel.cs
//PLACEHOLDER 2 : THE CAROUSELVIEW PROPERTIES Replace the line with the following snippet :
//Assign the passeg pages to the ItemsSource
carousel.ItemsSource = pages;
//Assign the freshly created template
carousel.ItemTemplate = template;
//The ItemSelected event is raised when the user swipes trough the
//carousel view. We subscribe to it to update the page indicators in
//Placeholder 3. Make sure to unsubscribe somewhere
carousel.PositionSelected += pageChanged;
//Add the carousel to the abolsute layout and set its boundaries to fill
//the entire layout
Children.Add(carousel);
AbsoluteLayout.SetLayoutBounds(carousel, new Rectangle(0, 0, 1, 1));
AbsoluteLayout.SetLayoutFlags(carousel, AbsoluteLayoutFlags.All);
//Create the button layout with as many buttons as there are pages
dotLayout = new DotButtonsLayout(pages.Count, Color.White, 10);
//Subscribe to the click events of the dot buttons to switch to the desired
//page
foreach (DotButton dot in dotLayout.dots)
    dot.Clicked += dotClicked;
Children.Add(dotLayout);
AbsoluteLayout.SetLayoutBounds(dotLayout, new Rectangle(0, 0.92, 1, .05));
AbsoluteLayout.SetLayoutFlags(dotLayout, AbsoluteLayoutFlags.All);
and now the last placeholder in which we will handle the events Replace //PLACEHOLDER 3 : PAGE EVENTS with
//The function that is called when the user swipes trough pages
private void pageChanged(object sender, SelectedPositionChangedEventArgs e)
{
    //Get the selected page
    var position = (int)(e.SelectedPosition);
    //Set all buttons opacity to 0.5 but the selected one, which we set to 1
    for(int i = 0;i<dotLayout.dots.Length;i++)
        if(position == i)
            dotLayout.dots[i].Opacity = 1;
        else
            dotLayout.dots[i].Opacity = 0.5;
}
//The function called by the buttons clicked event
private void dotClicked(object sender)
{
    var button = (DotButton)sender;
    //Get the selected buttons index
    int index = button.index;
    //Set the corresponding page as position of the carousel view
    carousel.Position = index;
}
Ok so we got everything finished now! Now evertime you want to use the Carouselview, simply create your page collection and create the carousel as follows:
var page1 = new CarouselContent();
var page2 = new CarouselContent();
var page3 = new CarouselContent();
var page4 = new CarouselContent();
//[Fill the pages fields with the content you desire]
//...
var pages = new ObservableCollection<CarouselContent>();
pages.Add(page1);
pages.Add(page2);
pages.Add(page3);
pages.Add(page4);
var carouselView = new Carousel(pages);
//Thats it! Simply add the carouselView to any Layout and you are all set!
So this is it!
You can find the whole project here : GitHub Project
I hope this is usefull for some of you, feel free to contact us if you get stuck somewhere, or have anything you'd like to say!
Cheers
Tom